
How to Pose for Pictures: 12 Rules That Work
How to pose for pictures in twelve rules that hold for any body and any camera: weight, angles, hands, chin and breath, plus the seconds before the shutter.
 Maya Chen 10 min read
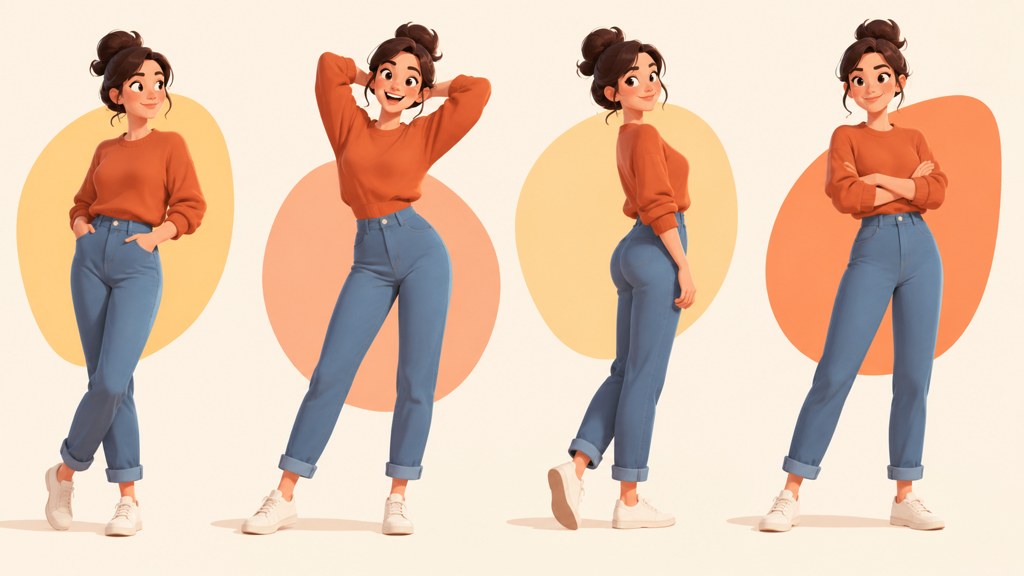
Learning how to pose for pictures comes down to five things you can control with your own body: where your weight sits, how far the shoulders are turned from the lens, what the hands are doing, where the chin goes, and whether you are breathing out when the shutter fires. Fix those and almost any frame improves. The twelve rules below are physical instructions rather than moods, which is why they hold standing, sitting, alone, in a crowd, on a phone or on a proper camera.
What are the basic rules of posing for a photo?
Every rule for how to pose for pictures has a reason attached. Read the reason, not the rule, because the reason is what tells you when to break it.
- Put your weight on the back foot. It drops one hip, tilts the shoulders the other way, and gives the body a curve instead of a column.
- Turn your shoulders 30 to 45 degrees off the lens, then bring your face back toward it. Square-on shoulders are the widest version of you that exists.
- Keep the knees soft. A locked knee pushes the pelvis forward and shortens the whole leg line.
- Get your elbows off your ribs. A gap of two fingers is enough to stop the upper arm flattening against the body.
- Push the chin forward, then down a fraction. Forward stretches the jaw away from the neck; down stops the nostrils becoming the subject.
- Drop your shoulders on the exhale. Held breath lifts them toward the ears and the tension shows in the trapezius every time.
- Give the front leg something to do. Cross it, point the toe at the camera, or bend it slightly. A straight pair of legs reads as standing in a queue.
- Lean the top of your body a few degrees toward the camera. It separates you from the background and stops the face receding.
- Break the line between arm and torso with a bend, a pocket or a prop.
- Look somewhere specific. Eyes with no target read as glazed, even in a fraction of a second.
- Move between frames rather than resetting. The half-second after a shift is where the good frame usually lands.
- Laugh at something real, then stop laughing slowly. The tail of a real laugh photographs better than the peak of a fake one.
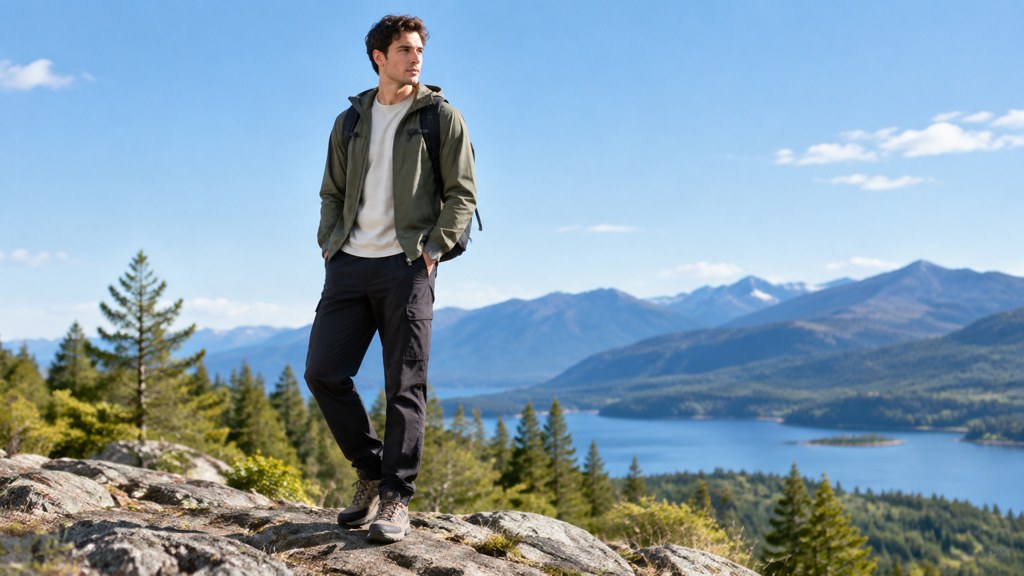
Working models run these as a loop rather than a checklist. Weight, turn, chin, breathe, shift, repeat. That is all model poses really are, a small set of adjustments cycled fast enough that the camera catches several versions.
What do you do with your hands in photos?
Hands are the first thing that goes wrong, because at rest they hang flat and the camera turns a flat palm into a paddle. The fix is to give them a job and to show them edge-on.
- A pocket, but only the thumb or the fingers, not the whole hand. A hand swallowed to the wrist looks amputated.
- Contact with your own body: a hand at the collar, on the opposite forearm, brushing hair back. Contact reads as intention.
- Something to hold. A cup, a bag strap, a jacket lapel. Props solve hands faster than any instruction about hands.
- A hip, with the wrist relaxed rather than braced. A braced wrist tightens the whole arm.
- Turned so the camera sees the narrow edge. The side of the hand is a line; the back of the hand is a shape.
Soft, not limp
Curl the fingers slightly, as though holding an egg. Fully straight fingers look posed and fully relaxed ones look asleep. The middle position is what photographers mean when they say soft hands.
How do you pose to look thinner or broader in a photo?
Both directions use the same two levers, turn and distance, in opposite ways. Turning the shoulders narrows the visible outline because you present a shallower cross-section. Squaring up broadens it for exactly the same reason.
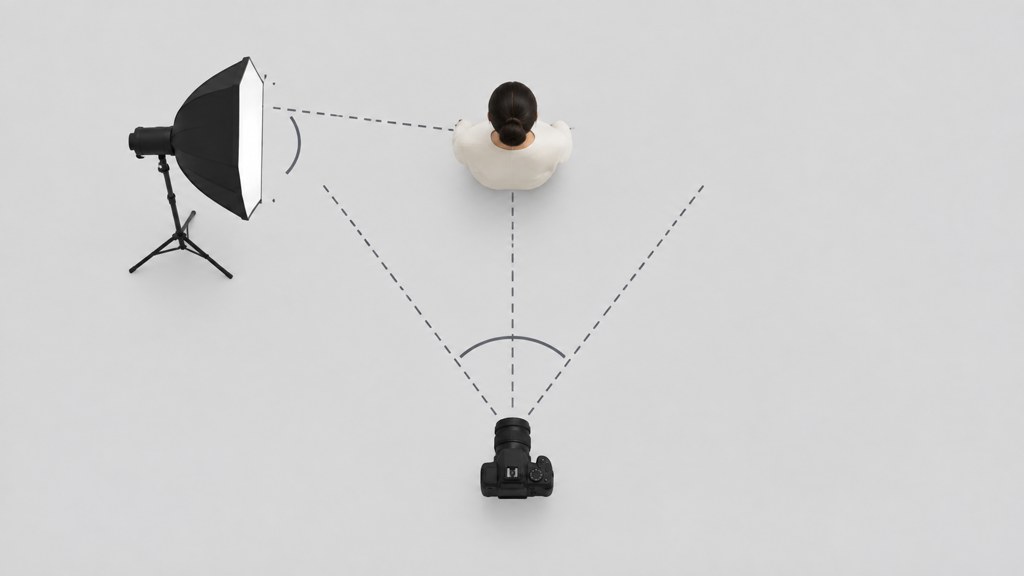
- To narrow: shoulders at an angle, front arm away from the body, chin forward, weight back, camera at or slightly above eye level.
- To broaden: shoulders square, feet apart, hands on hips or in pockets, camera slightly below eye level so the chest fills more frame.
- Distance beats every trick. Anything close to the lens grows, which is why a hand reaching toward the camera looks enormous and a face at arm's length gets a wider nose.
- Step back and zoom in rather than moving the camera closer. Nikon's own lens guide calls the 85mm a medium telephoto that is ideal for portraits, and puts the 50mm at roughly the field of view the human eye sees (Nikon Learn & Explore, checked 2026-09-07). On a phone the equivalent is the 2x or 3x lens, taken from further away.
Camera height changes proportion more than posture does. Raise the lens and the head grows while the legs shorten; drop it and the reverse happens. Neither is flattering by default, so decide which part of the body you want to give room to and then place the camera.
How should you pose standing versus sitting?
The two setups fail in different places. Standing collapses at the hips, sitting collapses at the spine, and each has a fix that takes about two seconds.
| Setup | Where it collapses | The two-second fix | Where to put the camera |
|---|---|---|---|
| Standing, front on | Knees lock, hips push forward, arms flatten | Weight to the back foot, front knee bent, elbows out | Eye level, or a touch above |
| Standing, leaning on a wall | Shoulder rolls forward, spine curves | Lean the hip, not the shoulder; keep the chest open | Eye level, square to the wall |
| Seated on a chair back | Spine rounds, stomach compresses | Sit on the front third of the seat, hinge forward from the hips | Slightly above eye level |
| Seated on the floor | Shoulders rise, neck disappears | Lean on one hand, drop the far shoulder, extend one leg | At or below the subject's eye level |
| Seated at a table | Elbows lock, torso squares up | Turn the chair 30 degrees, bring one forearm onto the table | Eye level from the turned side |
Sitting poses have one more trap: whatever touches the seat spreads. Perching on the front edge and hinging forward from the hips keeps the thighs off the chair and the back long. It feels precarious and photographs well, which is true of most posing.
What are good selfie poses that do not look posed?
A selfie has one fixed constraint: the camera is at arm's length, which is close enough for the nearest feature to enlarge. Everything else follows from managing that.
- Hold the phone slightly above the eye line and tip the screen down. Below eye level adds chin; far above adds forehead.
- Extend the arm fully and use the rear camera on a timer when you can. The front camera is wider and closer, which is the worst combination for a face.
- Turn the body away and bring the face back, exactly as you would standing. Selfie poses are not a separate discipline.
- Move a fraction between shots: turn the head, shift the jaw forward, look off camera then back. A frozen face is what makes a selfie read as posed.
- Put the light in front of you. A window facing you beats any filter, and a window behind you turns you into a shape.
Mirror selfies invert the rules because the phone becomes a prop and the body has somewhere to be. Angle the phone slightly so the flash does not land on the mirror, and keep the elbow away from the ribs.
How do you pose men and women differently, and where is that outdated?
The two long-tail versions of this question, how to pose for pictures women search for and how to pose for pictures men search for, produce almost identical advice once you strip out the styling. Weight, turn, chin and breath do not change between bodies.
- Still useful: clothing changes what a pose can do. A structured jacket holds a shoulder line; a soft knit needs the arms further from the body to keep any shape at all.
- Still useful: shoulder-to-hip proportion changes how visible a weight shift is, so a smaller shift can be enough on a wider-hipped frame.
- Outdated: the rule that women angle and men square up. Angling narrows anyone, squaring broadens anyone, and the choice belongs to the person, not to a category.
- Outdated: hands on hips for women, arms folded for men. Both are just ways of breaking the arm-to-torso line, and both work on anyone.
If you are shooting other people, ask what they want the picture to say before you start giving instructions. It is faster than guessing, and it stops you defaulting to a pose vocabulary borrowed from catalogue photography.
How do you find pose ideas before a shoot?
Most of what gets searched as how to pose for pictures is really a shot-list problem. Turning up with a list beats improvising, because the awkward part of any session is the first four minutes and a list carries you through them. Collect six to ten frames, sort them by setup rather than by mood, and put the easiest one first.
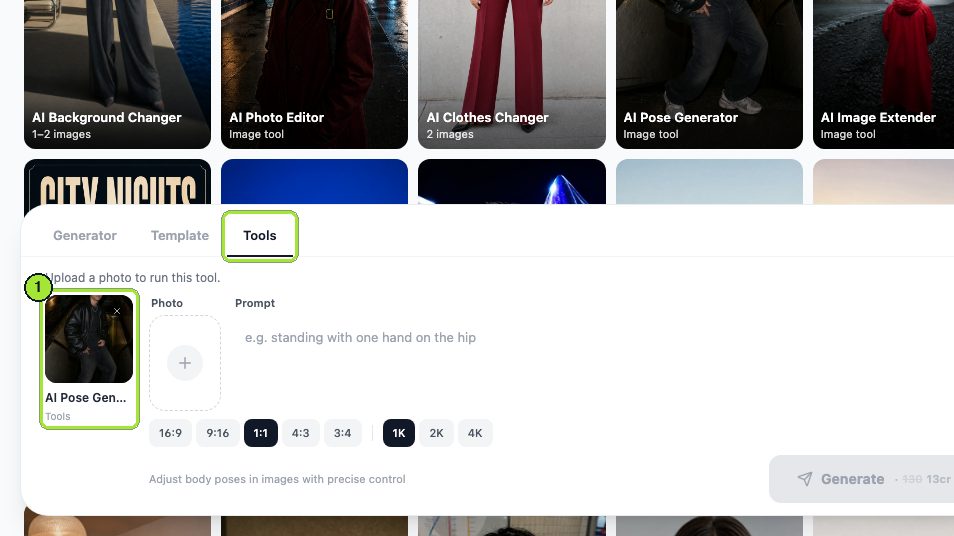
Generating the list is faster than hunting for it. The AI pose generator restages a full-body photo of the actual person into whatever pose you describe, so the shot list looks like your subject rather than a stranger in a stock library. Our test run used a fictional man's studio frame and two written poses.
- 1
Upload one full-body frame
The Photo box takes a single image. Even light and a visible full figure matter more than resolution.
- 2
Write the pose as body mechanics
Our first prompt named the seat, the 45 degree turn, the forearms on the knees and the chin position. Vague words such as confident produce a generic result.
- 3
Choose the frame shape
The ratio chips are the only framing control. We used 3:4 with 1K resolution for both runs.
- 4
Generate, then vary one instruction
Each run cost 13 credits and the price shows on the Generate button beforehand. The second run changed only the prompt, to a standing pose with hands in pockets and weight on the back foot.
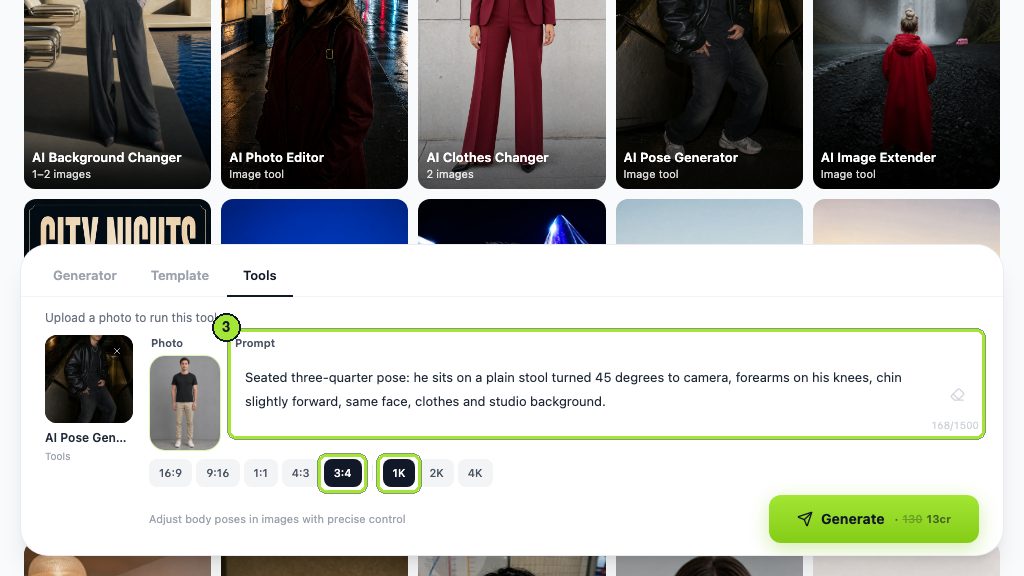
Seated three-quarter pose: he sits on a plain stool turned 45 degrees to camera, forearms on his knees, chin slightly forward, same face, clothes and studio background.

Two runs, 26 credits, a shot list you can hand to whoever is holding the camera. Both ran on GPT Image 2. If you want the finished frame rather than a plan, the AI headshot template does the styled version of the same job. A new account is given 40 free credits, which covers three images at 1K.
Ask for the camera position too
Pose instructions without a camera height produce flat eye-level results every time. Adding a phrase such as lens at chest height, subject turned left changes the frame far more than any adjective about the pose.
How do you pose in a group photo?
Groups fail because everyone stands on the same line at the same distance, which produces a police line-up with better clothes. Depth is the whole fix.

- Stagger people front to back by half a step. Overlapping shoulders read as a group; a straight rank reads as a queue.
- Vary the heads vertically. Someone sitting, someone leaning, someone standing straight, so the eye has a path.
- Front row angles inward, back row angles slightly the other way. It closes the shape without anyone having to hug.
- The person nearest the lens will look largest, so put whoever asked for the photo in the middle depth, not at the front corner.
- Give the whole group one instruction at a time. Six people cannot process a five-part correction, which is why group shots take so long.
Take three frames minimum on any group of four or more. Someone always blinks, and the fix is another frame rather than a heroic edit.
What are the most common posing mistakes?

- Locked knees. The single most common one, and it stiffens everything above the waist as well.
- Held breath. Counting to three while holding your breath raises the shoulders and tightens the jaw, and the count is why so many group photos look strained.
- Chin up. It feels assertive and photographs as nostrils. Forward and slightly down is almost always better.
- Arms glued to the ribs. Flattens the upper arm and widens the whole torso for free.
- Smiling on command. A smile started on cue arrives too late or too wide. Say something instead of counting.
- Standing exactly where you were told and never moving again. Stillness between frames is what makes a whole set look identical.
None of these need a better camera to fix. Photography magazines such as PetaPixel, which ran a guide to vintage portrait lenses on 6 September 2026, and gear sites such as DPReview are full of equipment answers to problems that are really posture problems. The lens changes proportion; the body changes everything else.
For deeper study, a school library such as NYIP's article collection and community galleries such as 500px are worth an hour of scrolling, and camera makers publish their own technique series, including Canon's tips and techniques hub.
Key takeaways
- How to pose for pictures reduces to five variables: weight, shoulder turn, hands, chin and breath.
- Turning narrows and squaring broadens, for the same geometric reason; camera distance and height then decide proportion.
- Standing collapses at the hips and sitting collapses at the spine, so each setup has its own two-second correction.
- Selfie poses follow the same rules, with the extra constraint that anything nearest a close lens enlarges.
- Groups need depth, not alignment: stagger by half a step and vary the head heights.
- Build a shot list before the session; the pose generator turns a photo of the actual person into one for 13 credits per image.
Image & Design Editor
Maya Chen
I spend my days inside image tools, testing prompts and settings on real photos so the steps here match what you actually see on screen.
FAQ
Common questions
How do you pose for pictures if you feel awkward?
Give yourself a task rather than a pose. Walk toward the camera, adjust a sleeve, look away and come back. Movement gives the body something to do, and the frame taken half a second after a shift almost always beats the one taken during a deliberate hold.
What is the most flattering angle for photos?
Body turned 30 to 45 degrees away from the lens with the face brought back toward it, chin pushed forward and slightly down, camera at or just above eye level. It narrows the outline, lengthens the jaw and keeps both eyes visible, which covers most of what people mean by flattering.
Where should you look in a photo?
At something specific. The lens, a person just beside it, or a fixed point off frame all work; unfocused eyes read as glazed even at a thousandth of a second. Switching your gaze between frames also stops a whole set looking identical.
How do you stop looking stiff in pictures?
Stop holding still. Shift your weight between frames, breathe out as the shutter fires, and keep your elbows off your ribs so the arms have a shape. Stiffness is nearly always locked knees, held breath and flat arms happening at the same time.
Do posing rules change for phone cameras?
The rules hold, but distance matters more. A phone lens is wide and usually close, which enlarges whatever is nearest it. Step back and use the 2x or 3x lens, or hand the phone to someone else and use the rear camera, and most phone distortion disappears.
Plan the shot list before the shutter
Upload one full-body photo, describe the pose in plain body mechanics, and get a shot list that looks like the person you are actually photographing. New accounts get 40 free credits.
Related reading
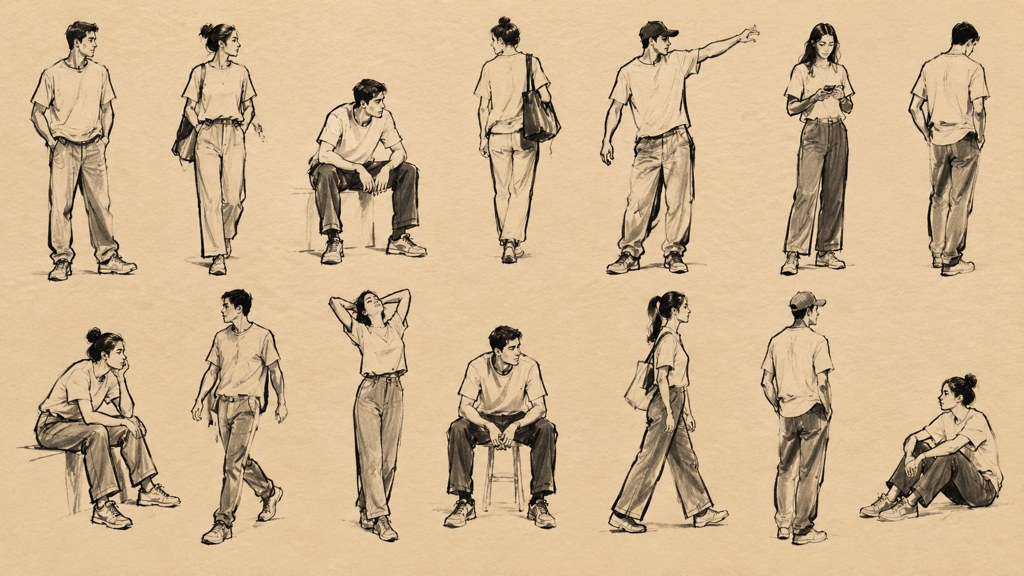
Pose Reference Library: 40 Poses by Use Case
Forty pose references sorted by what you need them for, figure drawing, portrait sessions, product shots, plus how to generate your own on demand.
10 min read
Couple Photo Poses: 20 That Do Not Look Stiff
Twenty couple poses grouped by height difference, comfort level and setting, plus the prompts that get two people moving instead of standing still.
9 min read
Car Photography: Angles, Light and Clean Edits
The five car angles buyers expect, the light that hides reflections, and the edits that clean a listing shot without misrepresenting the vehicle.
9 min read
How to Look Better in Photos: 5 Things That Work
Angle, posture, light, wardrobe and edit, in that order. The five variables that actually change how a photo of you reads, and how to test each one.
8 min read